

The concept of the Internet of Things is a trending topic and it has found implementation in numerous aspects. Computers, laptops, mobile phones, and other non-Internet-enabled physical devices like cars or smart grids can interact with each other. To do it, they need a standardized interface called API (application programming interface).
The advantage of using a unified interface is once you implement such a web service on your server, it can interact with a variety of client devices. In addition, it provides the ability to build a web application with separate back-end and front-end parts. You may use modern JavaScript frameworks to make user interfaces more dynamic and achieve good UX. Many organizations integrate their mobile applications with back-end CRM, ERP, EAM, and other tools to improve their productivity.
Symfony API
In our previous articles, we covered how to create API using the headless Drupal 8 approach (you can find them in the Useful links section at the end of the post). However, the functionality of a CMS may not have enough flexibility for projects with complex business logic. In such cases, using a PHP framework may become a preferable option.
Symfony is one of the most popular open-source PHP frameworks consisting of separate components. They are used in many large projects, such as Drupal 9 or Laravel. Symfony has an active community and stable support. Also, it has the expandable architecture of reusable components aka “bundles”, which extends the framework's functionality. The latest Symfony version has a lot of improvements, such as an automatic configuration of bundles with Symfony Flex and a simplified folder structure to increase the speed of development.
In this Symfony API tutorial, we will create a basic server back-end structure for your application using the REST API architecture style. We will use a 'FOSRestBundle' bundle as a basis, and implement 'get' and 'post' methods to create and show the list of resources. Besides that, we will add the OAuth2 authentication for REST API with FOSOAuthServerBundle.
Create a REST API
Firstly, make sure you have installed PHP 7.1 or higher and the Composer package manager to create a new Symfony application. After that, create a new project by executing the following command in the terminal:
composer create-project symfony/skeleton rest_api_projectWe use a basic Symfony skeleton project that is recommended for more barebones applications like microservices and APIs. Symfony 4.x has a new and more simplified directory structure. Here is what it looks like:

The config directory contains all bundle configuration files and a list of enabled bundles in the bundles.php file. Symfony 4 will automatically register all bundles after the installation using Symfony Flex recipes.
The public folder provides access to the application via the index.php entry point whereas the src folder contains all controllers, custom services, and objects. The var directory contains system logs and cache files. The vendor folder contains all external packages.
Now let’s install some necessary bundles with the сomposer.
composer require friendsofsymfony/rest-bundle
composer require sensio/framework-extra-bundle
composer require jms/serializer-bundle
composer require symfony/validator
composer require symfony/form
composer require symfony/orm-pack
Besides the friendsofsymfony/rest-bundle, we also installed the sensio/framework-extra-bundle. It will help us to make code easier to read by using annotations for defining our routes.
We will use jms/serializer-bundle to serialize and deserialize the resources of the application. We do have some validation requirements in our testing entity. Because of this, it’s also necessary to add a validator bundle. The form bundle will help us to handle incoming user data and convert it into a resource entity. We need to install symfony/orm-pack for the integration with Doctrine ORM to connect with a database. Database configuration may be set in the .env file.
###> doctrine/doctrine-bundle ###
# Format described at http://docs.doctrine-project.org/projects/doctrine-dbal/en/latest/reference/configuration.html#connecting-using-a-url
# For an SQLite database, use: "sqlite:///%kernel.project_dir%/var/data.db"
# Configure your db driver and server_version in config/packages/doctrine.yaml
DATABASE_URL=mysql://db_user:db_pass@127.0.0.1:3306/db_name
###< doctrine/doctrine-bundle ###
As a result, our bundles.php file should look like this:
<?php
return [
    Symfony\Bundle\FrameworkBundle\FrameworkBundle::class => ['all' => true],
    Sensio\Bundle\FrameworkExtraBundle\SensioFrameworkExtraBundle::class => ['all' => true],
    FOS\RestBundle\FOSRestBundle::class => ['all' => true],
    JMS\SerializerBundle\JMSSerializerBundle::class => ['all' => true],
    Doctrine\Bundle\DoctrineCacheBundle\DoctrineCacheBundle::class => ['all' => true],
    Doctrine\Bundle\DoctrineBundle\DoctrineBundle::class => ['all' => true],
    Doctrine\Bundle\MigrationsBundle\DoctrineMigrationsBundle::class => ['all' => true],
];
After we have finished with the installation, let's create a test resource entity. Create a new file called Movie.php inside the src/Entity folder.
<?php
namespace App\Entity;
use Doctrine\ORM\Mapping as ORM;
use Symfony\Component\Validator\Constraints as Assert;
/**
 * @ORM\Entity
 * @ORM\Table(name="movie")
 */
class Movie {
  /**
   * @ORM\Column(type="integer")
   * @ORM\Id
   * @ORM\GeneratedValue(strategy="AUTO")
   */
  private $id;
  /**
   * @ORM\Column(type="string", length=100)
   * @Assert\NotBlank()
   *
   */
  private $name;
  /**
   * @ORM\Column(type="text")
   * @Assert\NotBlank()
   */
  private $description;
  /**
   * @return mixed
   */
  public function getId()
  {
    return $this->id;
  }
  /**
   * @param mixed $id
   */
  public function setId($id)
  {
    $this->id = $id;
  }
  /**
   * @return mixed
   */
  public function getName()
  {
    return $this->name;
  }
  /**
   * @param mixed $name
   */
  public function setName($name)
  {
    $this->name = $name;
  }
  /**
   * @return mixed
   */
  public function getDescription()
  {
    return $this->description;
  }
  /**
   * @param mixed $description
   */
  public function setDescription($description)
  {
    $this->description = $description;
  }
}
Run the bin/console doctrine:schema: create command in the application directory to create a database structure according to our movie class with Doctrine ORM. We need to create a simple form for the Movie entity inside the src/Form folder to handle and validate a user’s request to post a new movie:
<?php
namespace App\Form;
use Symfony\Component\Form\AbstractType;
use Symfony\Component\Form\FormBuilderInterface;
use Symfony\Component\Form\Extension\Core\Type\SubmitType;
use Symfony\Component\OptionsResolver\OptionsResolver;
use App\Entity\Movie;
class MovieType extends AbstractType
{
  public function buildForm(FormBuilderInterface $builder, array $options)
  {
    $builder
      ->add('name')
      ->add('description')
      ->add('save', SubmitType::class)
    ;
  }
  public function configureOptions(OptionsResolver $resolver)
  {
    $resolver->setDefaults(array(
      'data_class' => Movie::class,
      'csrf_protection' => false
    ));
  }
}# Read the documentation: https://symfony.com/doc/master/bundles/FOSRestBundle/index.html
fos_rest:
routing_loader:
default_format: json
include_format: false
body_listener: true
format_listener:
rules:
- { path: '^/', priorities: ['json'], fallback_format: json, prefer_extension: false }
param_fetcher_listener: true
access_denied_listener:
json: true
view:
view_response_listener: 'force'
formats:
json: true sensio_framework_extra.view.listener:
alias: Sensio\Bundle\FrameworkExtraBundle\EventListener\TemplateListenerto resolve the issue when FOS Rest Bundle is incompatible with the Sensio Framework Extra Bundle (https://github.com/FriendsOfSymfony/FOSRestBundle/issues/1768).
Now it’s time to create a controller where we will add two methods to create a new movie and get the list of all the movies. As you understand, it should be placed inside the src/Controller folder.
<?php
namespace App\Controller;
use Symfony\Component\HttpFoundation\Request;
use Symfony\Component\HttpFoundation\Response;
use FOS\RestBundle\Controller\FOSRestController;
use FOS\RestBundle\Controller\Annotations as Rest;
use Sensio\Bundle\FrameworkExtraBundle\Configuration\Route;
use App\Entity\Movie;
use App\Form\MovieType;
/**
* Movie controller.
* @Route("/api", name="api_")
*/
class MovieController extends FOSRestController
{
/**
* Lists all Movies.
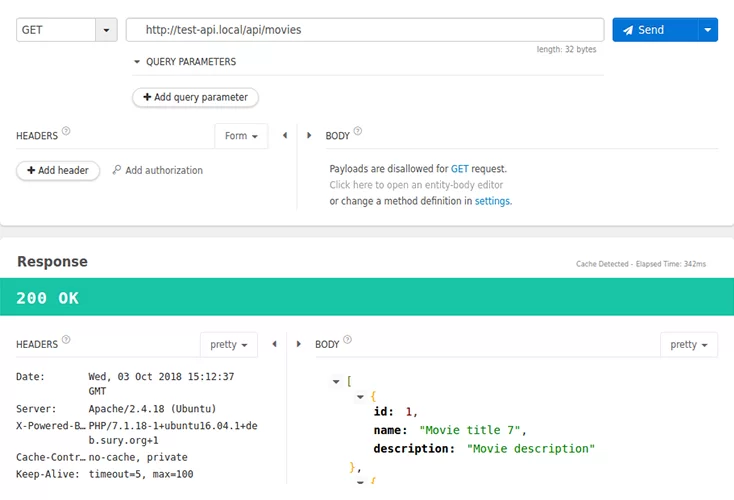
* @Rest\Get("/movies")
*
* @return Response
*/
public function getMovieAction()
{
$repository = $this->getDoctrine()->getRepository(Movie::class);
$movies = $repository->findall();
return $this->handleView($this->view($movies));
}
/**
* Create Movie.
* @Rest\Post("/movie")
*
* @return Response
*/
public function postMovieAction(Request $request)
{
$movie = new Movie();
$form = $this->createForm(MovieType::class, $movie);
$data = json_decode($request->getContent(), true);
$form->submit($data);
if ($form->isSubmitted() && $form->isValid()) {
$em = $this->getDoctrine()->getManager();
$em->persist($movie);
$em->flush();
return $this->handleView($this->view(['status' => 'ok'], Response::HTTP_CREATED));
}
return $this->handleView($this->view($form->getErrors()));
}
}
OAuth2 authorization
There are several authorization methods for REST APIs. Let’s take OAuth2 as an example of the most popular method. It allows using auth details from an external provider like Google or Facebook to identify yourself. In our application, we will use FOSUserBundle as a user provider, install this bundle with composer, then install FOSOAuthServerBundle as it is shown here:
composer require friendsofsymfony/user-bundle
composer require friendsofsymfony/oauth-server-bundlefos_oauth_server:
db_driver: orm
client_class: App\Entity\Client
access_token_class: App\Entity\AccessToken
refresh_token_class: App\Entity\RefreshToken
auth_code_class: App\Entity\AuthCode
service:
user_provider: fos_user.user_provider.username
options:
access_token_lifetime: 86400
refresh_token_lifetime: 1209600
auth_code_lifetime: 30Import routes from fos_auth_server bundle into config/routes.yaml
#index:
#    path: /
#    controller: App\Controller\DefaultController::index
fos_oauth_server_token:
    resource: "@FOSOAuthServerBundle/Resources/config/routing/token.xml"

fos_oauth_server_authorize:
    resource: "@FOSOAuthServerBundle/Resources/config/routing/authorize.xml"
Create a user class for FOSUserBundle
<?php
namespace App\Entity;
use FOS\UserBundle\Model\User as BaseUser;
use Doctrine\ORM\Mapping as ORM;
/**
 * @ORM\Entity
 * @ORM\Table(name="fos_user")
 */
class User extends BaseUser
{
  /**
   * @ORM\Id
   * @ORM\Column(type="integer")
   * @ORM\GeneratedValue(strategy="AUTO")
   */
  protected $id;
  public function __construct()
  {
    parent::__construct();
  }
}fos_user:
db_driver: orm
firewall_name: main
user_class: App\Entity\User
from_email:
address: resetting@example.com
sender_name: Demo Resettingsecurity:
encoders:
FOS\UserBundle\Model\UserInterface: bcrypt
role_hierarchy:
ROLE_ADMIN: ROLE_USER
ROLE_SUPER_ADMIN: ROLE_ADMIN
providers:
fos_userbundle:
id: fos_user.user_provider.username
firewalls:
oauth_token:
pattern: ^/oauth/v2/token
security: false
oauth_authorize:
pattern: ^/oauth/v2/auth
form_login:
provider: fos_userbundle
check_path: /oauth/v2/auth_login_check
login_path: /oauth/v2/auth_login
use_referer: true
api:
pattern: ^/api
fos_oauth: true
stateless: true
anonymous: false
main:
pattern: ^/
form_login:
provider: fos_userbundle
csrf_token_generator: security.csrf.token_manager
anonymous: true
access_control:
- { path: ^/api, roles: [ IS_AUTHENTICATED_FULLY ] }
- { path: ^/createClient, roles: [ IS_AUTHENTICATED_ANONYMOUSLY ] }
<?php
namespace App\Controller;
use Symfony\Component\HttpFoundation\Request;
use FOS\RestBundle\Controller\FOSRestController;
use FOS\RestBundle\View\View;
use FOS\RestBundle\Controller\Annotations as FOSRest;
use Symfony\Component\HttpFoundation\Response;
use FOS\OAuthServerBundle\Model\ClientManagerInterface;
class SecurityController extends FOSRestController
{
  private $client_manager;
  public function __construct(ClientManagerInterface $client_manager)
  {
    $this->client_manager = $client_manager;
  }
  /**
   * Create Client.
   * @FOSRest\Post("/createClient")
   *
   * @return Response
   */
  public function AuthenticationAction(Request $request)
  {
    $data = json_decode($request->getContent(), true);
    if (empty($data['redirect-uri']) || empty($data['grant-type'])) {
      return $this->handleView($this->view($data));
    }
    $clientManager = $this->client_manager;
    $client = $clientManager->createClient();
    $client->setRedirectUris([$data['redirect-uri']]);
    $client->setAllowedGrantTypes([$data['grant-type']]);
    $clientManager->updateClient($client);
    $rows = [
      'client_id' => $client->getPublicId(), 'client_secret' => $client->getSecret()
    ];
    return $this->handleView($this->view($rows));
  }
}

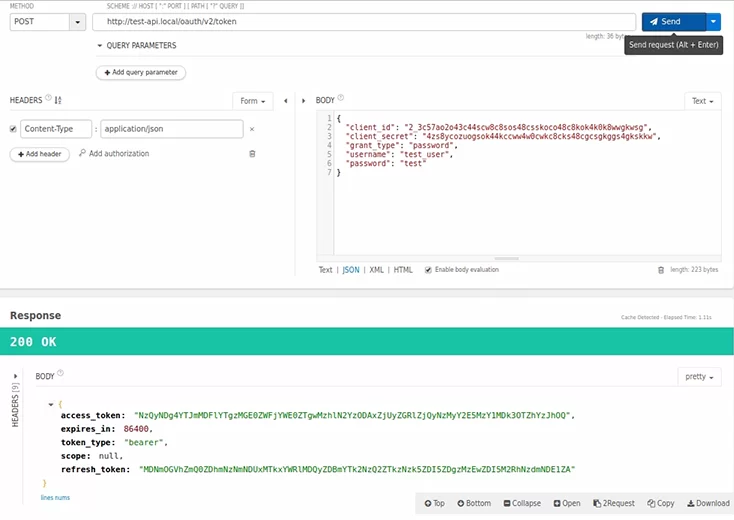
If everything is going right, we should receive the access token that we should send to the API request in headers, as follows
Authorization: Bearer NzQyNDg4YTJmMDFlYTgzMGE0ZWFjYWE0ZTgwMzhlN2YzODAxZjUyZGRlZjQyNzMyY2E5MzY1MDk3OTZhYzJhOQ
That’s all for now, our API Platform implementation is completed. We have added two endpoints to create and show the list of resources and added OAuth2 authorization. If you have missed something, you can check the code in the repository.
Have fun building your own application!
Useful links
RESTful Web Services in Drupal 8 quick start guide
How to create a headless Drupal site
Building a CRM on Symfony | A case study